On the next screen is listed all of the curves in the LAS file, referenced with the name, the curve units, the API number, and description.
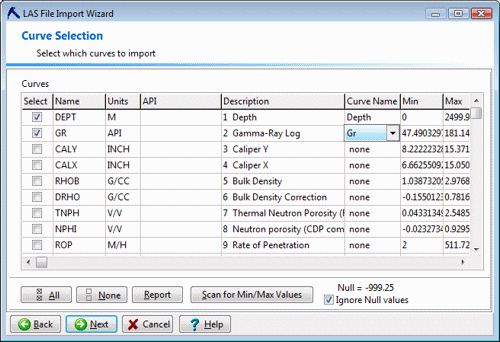
- Select: Choose which curves are to be imported by inserting a check in the check-box by the item's name. Those items to be ignored can be left blank. You can use the All or None buttons to easily select or clear all of the check-boxes.
! If the LAS file contains downhole survey measurements, these will be included in this curve listing. You don't need to import this survey data in this step - the next step of the import process is dedicated to these azimuth and inclination fields.
! You must select at least one curve for the import process to complete.
- Curve Name: Choose where the selected curves are to be imported, by clicking on the cell in the Curve Name column and choosing an option. They can be placed into a specific field in the P-Data table.
- Use the Scan for Min/Max Values button if you want to see a summary of each curve's data values. If you prefer that any Null values be excluded from the scan summary, be sure the Ignore Null Values box is checked. (Ignore-nulls does not affect the data being imported, just the scan summary displayed here.)
- Click on the Report button if you want to generate a text report of the curve names, units, and min/max values for later use in refining the P-Data table settings.
Name Units Min Max
------ ------ ------ ------
DEPT F 519.5 2003
BS IN 12.25 12.25
CALI IN 11.938 15.812
SGR GAPI 24.547 107.093
CGR GAPI 25.953 93.103
SP MV 37.409 115.125
LLD OHMM 5.235 40.565
LLG OHMM 4.951 38.453
LLS OHMM 4.128 25.52
MSFL OHMM 0.491 22.328
- Click on the Next button.

RockWare home page