RockWorks | Utilities | Imagery |
Append (Image -> Existing Map)
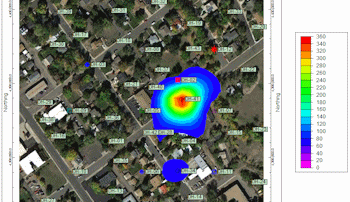
This program is used to add a raster image to an existing RockPlot2D file in order to add aerial photos to your maps. This procedure supports BMP, JPEG, TIFF, WMF, EMF, PNG, GIF, TGA, and PCX formats. For very large images you may want to resize them to save disk space and for better viewing quality using the Raster Conversion utility.
Menu Options
Step-by-Step Summary
Menu Options
- Primary (Rw2D Diagram) File: Click to the right to browse for the existing RockPlot2D image (Rw2D file) to which the raster image is to be appended.
- Secondary (Raster Image) File: Click here to browse for the name of the raster image file to be appended to the RockPlot2D graphic. The file formats listed above are supported.
- Output (Rw2D Diagram) File: Click here to type in a name for the new, combined image which will be displayed in a new RockPlot window.
- Plotting Sequence
-
- Plot Raster Image First: Choose this option if the raster image is to be plotted first, with the Rw2D contents on top of it.
- Plot Raster Image Last: Choose this option if the raster image is to be plotted last, on top of the existing Rw2D file contents.
! Note that you can change the stacking order interactively once the map is plotted in RockPlot2D.
- Position
- Minimum X: Easting in world/diagram coordinates for the west/left edge of the image.
- Minimum Y: Northing in world/diagram coordinates for the south/bottom edge of the image.
- Maximum X: Easting in world/diagram coordinates for the east/right edge of the image.
- Maximum Y: Northing in world/diagram coordinates for the north/top edge of the image.
Step-by-Step Summary
- Be sure the image to be imported and the existing Rw2D file are both present in the current project folder.
- Access the RockWorks Utilities program tab.
- Select the Imagery | Append (Image -> Existing Map) menu option.
- Enter the requested menu settings, described above.
- Click the Process button to proceed.
The program will open the raster image or the Rw2D file, depending on the plotting sequence you selected, and then append the other file to it. The combined diagram will be displayed in a RockPlot2D tab.
- You can adjust any of the options along the left and click the Process button to regenerate the map display.
! Each time you click the Process button, the existing display will be replaced.
- View / save / manipulate / print / export the map in the RockPlot2D window. (More.)
Tips
- Adjust the stacking order of the map or the image by right-clicking on the layer name, or on the item itself, and selecting Bring to Front or Send to Back.
- Adjust the transparency of the raster image by right-clicking on it and adjusting the Opacity setting.
See also
 Back to Imagery Menu Summary

RockWare home page