RockWorks | Utilities | Imagery |
Horizontal Images (Single)
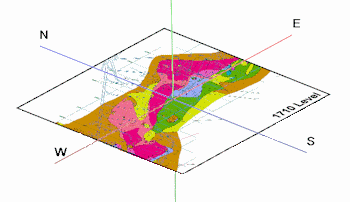
This program floats a single raster image at a specified elevation. Supported bitmap formats include: BMP, JPG, EMF and WMF, PCX, PNG, TGA, and TIFF.
! The bitmap must reside in the current project folder.
Menu Options
Step-by-Step Summary
Menu Options
- Image File: Click to the right to browse for the name of the bitmap image you want to float. Supported formats are listed above.
- Elevation: Enter here the elevation at which the bitmap is to be floated.
- Image Location: You have several options for entering the coordinates at which the bitmap is to be displayed in RockPlot3D:
- Output Dimensions: Choose this option if the current output dimensions represent the border coordinates for the image you've selected.
- World File: Choose this option if there is an accompanying World File which defines the image extents. Expand this heading to select the World File.
- Automatically Determine: Choose this option if the program is to search automatically for a World File with the same file name as the Image File, above, and with either world file name extensions: *.bmpw or *.bpw (italicized letters are replaced by the extension characters of the Image File, as in *.pngw or *.pgw, etc.)
- Manually Select: Choose this option to specify the name for the World file. Expand this heading to browse for the World file to be used for georeferencing the selected image.
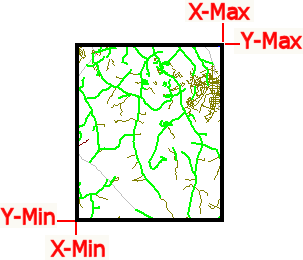
- Manually Specify: Click in this radio button if you want to type in the X and Y coordinates for each bitmap corner. Expand this heading to enter those coordinates.
- Western Border: Enter the X (Easting) coordinate represented along the western edge of the image (X-Min).
- Southern Border: Enter the Y (Northing) coordinate represented along the southern edge of the image (Y-Min).
- Eastern Border: Enter the X (Easting) coordinate represented along the eastern edge of the image (X-Max).
- Northern Border: Enter the Y (Northing) coordinate represented along the northern edge of the image (Y-Max).
- Layer Name: Type in a name for this layer; it will simply be used to label the floating bitmap in RockPlot3D. For example, if the image represents a satellite image, you might name this layer "Satellite Image."
- Set Transparent Color: Insert a check in this box if you want to specify a specific color in the bitmap image to be displayed transparent. For example if the image has a white background and you would like that part to be see-through, you would select white.
If activated, expand this heading to click on the color box to choose the image color that is to be set to transparent.
- Reference Cage: Insert a check here to include reference labels or lines in the output 3D image. More
Step-by-Step Summary
- Access either the RockWorks Utilities program tab. This tool does not read data from the main data window.
- Select the Imagery | Horizontal Images | Single menu option.
- Enter the requested menu settings, described above.
- Click the Process button to continue.
The program will read the indicated bitmap image, and, if manually specified, assign its corners the indicated coordinates. The image will be displayed in a RockPlot3D tab in the Options window.
If you requested use of an automatically-determined World file, the program will do this:
- It will start searching for a file in the project folder that uses the 4-character world file extension (such as ".bmpw" or ".pngw"). If that file exists, it becomes the World file.
- The program then searches for a file that uses the 3-character extension (such as ".bpw" or ".pgw"). If that file exists, it becomes the World file and supersedes the 4-character file (if it existed).
The floating image will be displayed in a RockPlot3D tab.
! If neither the 4-character nor the 3-character version of the World file exists, the program will present the user with the following error message: "Unable to locate a "World" file that corresponds to the following raster image: (file name). Neither World file naming convention was found (examples shown)."
- You can adjust any of the options along the left (such as elevation or transparent color) and click the Process button to regenerate the 3D image.
! Each time you click the Process button, the existing display will be replaced.
- View / manipulate the image in RockPlot3D.
Tip: Use RockPlot3D’s File | Save As to save the floating bitmap view, then use File | Append to append an existing RockPlot3D view to this image.
See also: Rectifying Images if you need to rotate and/or crop the image prior to floating the image. This tool also offers creation of a world file.
 Back to Imagery Menu Summary

RockWare home page