
RockWorks | Utilities | EarthApps | Images | Drape | Raster Labels
This program:
- Reads a listing of data from the Datasheet Edior: text labels, XY locations for the center points of the labels, text size and color.
- Creates an output KML file listing raster image versions of the labels at those locations, draped over the ground surface.
- Creates a KMZ (zip) output file, containing the KML and the image files.
- Loads the KMZ file in Google Earth, displaying the raster label images.
Google Earth does a great job of displaying labels with its placemarks, and these labels are sized dynamically - they plot at about the same size whether you are zoomed way in toward the point or zoomed far outward from the point.
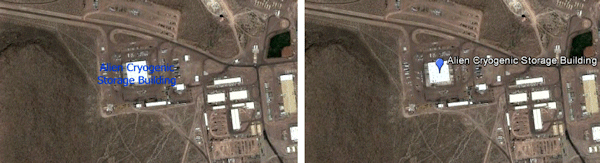
The purpose of this tool is to display text at a specific, and constant, size in Google Earth. Compare the following examples - the blue raster-label text on the left does not rescale based on the zoom state, while the Google Earth labels do.

Menu Options
Step-by-Step Summary
Menu Options
- Input Columns: The prompts along the left side of the window let RockWorks know which columns in the input datasheet contain the required data.
Click on an existing column name to select a different name from the drop-down list. See a sample data layout below.
- Label: Select the column that contains the text to be displayed in Google Earth.
- X (Easting): Column that contains the X coordinates for the center of the text label blocks.
These can be Eastings in meters or feet, decimal longitudes, etc. See Defining your Datasheet Coordinates for more information.
- Y (Northing): Column that contains the Y coordinates for the center of the text label blocks.
- Size: Column that contains the size declarations for the character heights. Be sure you declare the units for this column.
- Color: Column that contains the color for the text labels.
Step-by-Step Summary
- Access the Utilities program tab.
- Create a new datasheet and enter or import your label text, locations, size, and colors into the datasheet.
Or, open one of the sample files and replace that data with your own. (In this example, the sample file = "RockWorks17 Data\EarthApps Samples\Drape_Raster_Labels_01.rwDat")

Longitude and latitude coordinates must be in decimal format. If you're using another coordinate system, be sure you've specified the Units and the Projection Settings as appropriate. Be sure that your Size settings are also labeled with their units. Use "^" symbols for line breaks in the text labels.
- Select the RockWorks | Utilities | EarthApps | Images | Drape | Raster Labels menu option.
- Enter the menu options as described above.
! Tip: If you're working with one of the sample .rwDat files, you can load its specific menu settings by (1) clicking on the Menu button at the top of the window, (2) clicking Load from RCL, and (3) browsing for the .rcl file with the same name as the .rwDat file you're working with.
- Click the Process button to continue.
The program will create raster image files for the listed labels. It will create a KML file listing these image names at the defined locations. It will create a KMZ (zip) file which contains the KML file and the image files. The Google Earth KML and KMZ file names will be assigned automatically.
- If RockWorks displays the KMZ name in a popup window for your reference, you can confirm:
- Automatically load file into Google Earth: Be sure this is checked if you want to display the output at this time.
- Show this message every time a KMZ File is Created: If checked, this window will be displayed each time a Google Earth output is created. Uncheck this if you prefer not to see this window in the future.
(Both of these settings are also available via the Preferences menu.)
- Click OK to continue or Cancel to cancel the operation.
The resulting output will be displayed in Google Earth, if requested.
 Back to Image Maps Summary
"Google" is a trademark of Google Inc.

RockWare home page