RockWorks | Preferences | General Program Settings
The Preferences menu, at the top of the RockWorks program window, contains a General Program Settings option, which is used to establish some general operational settings for the program. These are global settings that will not change as you work in different projects. Click on a topic below to jump to its description.
Menu Options
On Startup
Borehole Orientations
Datasheet
Decimal Places
Diagram Scaling
Fonts
Google Earth
Image Format
Menus
New Projects
PLSS Land Grid
Project Manager
RockPlot2D
Updates
Visible Features
Warnings
Miscellaneous
On Startup - Use these settings to determine program behavior on startup. (Changes will take effect the next time that RockWorks is launched.)
- Prompt for Project Folder: Insert a check here if you would like to be prompted on program startup for the name of the project to be loaded. By default this is not checked, and when the program is launched it will simply load the last-used project or, if you're new to the program, the tutorial "Samples" folder.
! Note that you can change the current Project Folder at any time while you are working with the program. See Creating a New Project Folder for information.
- Start in "Root" folder: Choose this option for the program to display a typical browse window, showing the folders in the default \My Documents\RockWorks17 Data folder.
- Display List of Recent Projects: Choose this option if you prefer to see a list of recently-accessed project folders.
Borehole Orientations: Use these settings to fine-tune how the program converts depths to XYZ coordinates and handles "noisy" surveys.
- Smooth Azimuths: Check this box to smooth the bearings using a moving average.
- Depth Filter Size: Type in the distance, in your project units, within which the moving average filter is to be applied.
- Use Inclination Cutoff: Check this box if you want to restrict the smoothing to a specific inclination range.
- Maximum Angle from Vertical: Type in the maximum angle tolerance from vertical within which the smoothing is to take place.
The effects of these tools are most dramatic when the items that are being plotted are offset from the log axis as shown by the diagram below.

- Adjust Near Vertical Azimuths: Insert a check in this box to reduce noisy azimuth (bearing) data which can be a problem with automated collection tools.
- Maximum angle from vertical: Into this prompt type in the maximum angle tolerance from vertical for survey points to be modified. For example, if you are only concerned with survey points that are vertical downward plus or minus 5 degrees, you would enter: 5
- Replacement Azimuth
- Automatic: Choose this option to have the program replace the bearings for portions of the well within the maximum angle with the last azimuth.
- Manual: Choose this option to type in the replacement azimuth.
- Borehole Deviation - Computational Resolution:
First, some background: For non-vertical holes, RockWorks interpolates XYZ points at regular intervals down the hole based on the downhole azimuth/inclination data in order to create a 3-dimensional polyline. This calculation is performed once unless the downhole survey data is changed or if the user selects one of the Borehole Manager | Edit | Calculate XYZ Values options. This 3D polyline is then used to determine the xyz coordinates for all of your downhole data by performing a weighted average of the closest polyline point above and the closest polyline point below the depth in question.
In previous versions, the spacing between the points within the 3D polyline was hardwired. Now you can adjust this resolution using these settings.
- Automatic: Choose this option to have the polyline resolution based on a number of points.
- Points per Borehole: Type into this prompt the number of points per borehole for the deviation polyline.
- Manual: Choose this option to have the polyline resolution based on a distance value.
- Point Spacing: Type into this prompt the distance between polyline points in your project units. For example, if you type in "5.0" and your grid and model dimensions are in meters, then the program will generate the 3D polyline at 5 m intervals.
Datasheet
- Load Last-Used File into Datasheet Editor on Startup: Insert a check here if the program is to load into theUtilities data window, automatically on startup, the last datasheet with which you were working. This is a handy time-saver if you're working with the same file over an extended period of time. This option is enabled by default.
! If a file has been loaded into the datasheet editor and you then change to a different project folder and close the program, the program will not attempt to automatically load the file into the datasheet when the program is restarted.
Decimal Places
- Decimals to Display for Real Numbers: Use this setting to define the number of decimal places to define for floating point numbers in the datasheet. (Default = 7; you can choose between 1 and 15 decimal places).
Diagram Scaling: Use this option to define how the program will scale the items within graphic diagrams.
- Based on Project Dimensions: This is the default setting. This tells the program to dimension diagram items (such as log widths, text sizes, etc.) as a percent of the XYZ range of the project. You can see the XYZ extents for the project in the Dimensions pane's Summary window.
Example: Let's say your project's XYZ extents are 1000 feet. If your log stratigraphy columns are set to a size of "2" (representing percent), then they'll be displayed at an actual diagram width of 20 feet. When displayed in RockPlot2D you could use the Measure | Distance tool to actually measure the item's actual diagram width.
The benefit of this method is that the relative sizes of these diagram items should work well for projects of many different sizes.
- Based on Custom Size: Choose this item if you want to manually establish a reference size, and expand this heading to enter the size. For example, if you set the size to "500", and your log stratigraphy columns were set to a size of "2", then they'll be displayed at an actual diagram width of 10 feet.
Fonts
- Datasheet Font: Click on this item to select the font to be used in the datasheet. You can also specify font color and size. This will not take effect until the next time you start up the program.
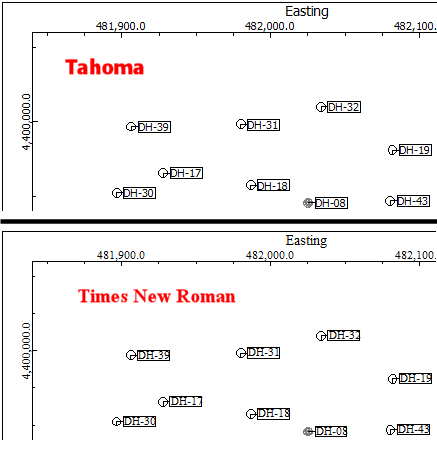
- RockPlot 2D Default Font: Use this setting to establish the font style that will be used in your 2D graphics. Compare the examples below. Note that once the graphic image has been created and is displayed in RockPlot2D, you can change individual item fonts there, as well. See Editing Text Attributes for more information.
Google Earth
- When Creating KMZ (Google Earth Files)...
- Automatically launch Google Earth: Check this option if you always want RockWorks to launch Google Earth (or transfer over to it, if already running) when you create a Google Earth output file (KMZ). This will affect the Utilities | EarthApps programs, the Google Earth exports from RockPlot2D, and the Google Earth exports from RockPlot3D.
- Confirm Google Earth auto-launch: If checked, RockWorks will display a prompt window telling you the name of the KMZ file that was created and confirming that you really want to display the KMZ file at this time. Uncheck this if you prefer not to see this window in the future.
Both of these settings can be turned off from within the displayed prompt windows.
Image Format: Use this setting to choose the default file type for exports. Choose from one of the displayed raster image formats.
Menus
- Main Menu - These settings affect the size of the program windows and the appearance of the main menus. These changes for the starred items take effect the next time that RockWorks is launched.
- Show Icons within Main Product Tabs *: Check this box if you want the interface tabs ("Home", "Utilities", "Borehole Manager") along the top of the program window to include icons.
- Menu Dimensions:
- Full Screen: Click in this radio button if you want the main RockWorks program window to always start up in maximized mode, filling the screen.
- User Defined: Click in this radio button if you want the main program window to start up at the size at which it was last displayed prior to closing the program.
- Show Icons within Horizontal Menu Bars*: Check this box if you want the menu items at the top of each RockWorks interface to include icons.
- Application Menus: These settings affect the program windows which are displayed when you select a RockWorks menu option. Starred items will take effect the next time the program is launched.
- Show Instructions within Menus: Defines whether the help topics are to be displayed within the Options windows.
- Display Instructions as First Tab (in front): Click this option if the Instructions pane is to be the first tab in the tab sequence.
- Display Instructions as Last Tab (in back): Click this if the Instructions pane is to be the last tab in the sequence.
- Menu Dimensions:
- Full Screen: Click in this radio button if you want the RockWorks application windows - such as the window that you see when you select the Map | Borehole Locations menu option - to always be displayed initially in maximized mode, filling the screen. You can always use the standard Windows methods of moving the window, making it smaller, etc.
- User Defined (Based on Last-Used): Click in this radio button if you want the program applicaton windows to be displayed at the size of the previous application window before it was closed.
- Show Icons within Menus *: Check this box if you want the tree menus in all of the program window to contain icons, or not. Some users find them helpful, others find them distracting. The example on the left is a tree menu with no icons, and that on the right contains icons.

- When Saving/Viewing RCL Menu Settings
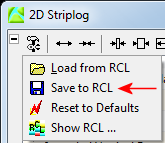
- Prompt for which Nodes to Include : Most of the RockWorks application menus contain a Special Menu Options button in the upper-left corner. One of the options is to save all of the settings in that menu to an "RCL" file for backup, to share with colleagues, or to list in a script.
If this "Prompt" option is checked, you will be prompted whether you want to save all of the settings or just those within activated items or "nodes".
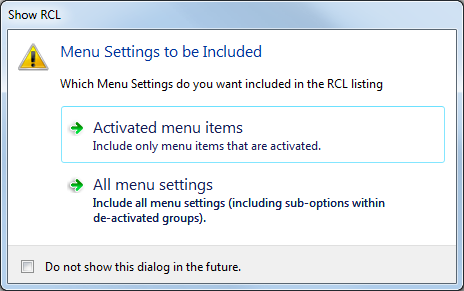
- Include All Menu Nodes when Saving RCL Menu Settings: If you don't want to be prompted as above and always want to save all of the menu items in your RCL lists, check this item.
New Projects: If you aren't using the default SDB database type or the assumed settings, you can use these settings to streamline the process of setting up a new project database (SQL Server, etc.). These options are displayed in the New-Project window under the advanced settings; if you set them up here they'll become defaults when you create your next new project.
! Don't edit these unless you need to customize the process of creating a new database because of a different provider (SQL Server) or specific login requirements.
- Display prompt for new Data Source: Check this box if you need to edit the connection to your database. This will enable the program to display a Connection window where you can set up the data provider and location prior to creating the new project.
- Display DB Login Prompt: Insert a check here if your database is set up to require a login and password and if, when creating or opening a project, you wish to be prompted to enter the login information. Leave this unchecked if your SQL Server is configured to pass through your network login (Windows NT Integrated Security) and the database login prompt does not need to be shown.
- Default DB Server: Defines the location of the database server.
- Default Data Provider: RockWorks defaults to SQLite. You can use this prompt to choose a different default database provider (SQL Server, etc.).
PLSS Land Grid - Use these settings to tell the program which library of Range/Township/Section locations you wish to use for converting PLSS descriptions to XY coordinates, or for creating section or lease maps.
- Use RockWare's Land Grid Files: Choose this option if you would like to use the default RockWare LandBase for spotting wells and creating maps. The hardwired location for this collection of files will be shown below this option. Please see the RockWare LandBase topic for details.
- Use Imported Land Grid Files: Choose this option if you have imported commercial land grid data and created a custom library of PLSS information. You should also choose this option if you have created a custom library which is a subset of the large RockWare LandBase. Please refer to the Landgrid Table documentation for details.
- Folder for Imported Land Grid Files: Click here to browse for the name of the folder where you created the custom look-up tables.
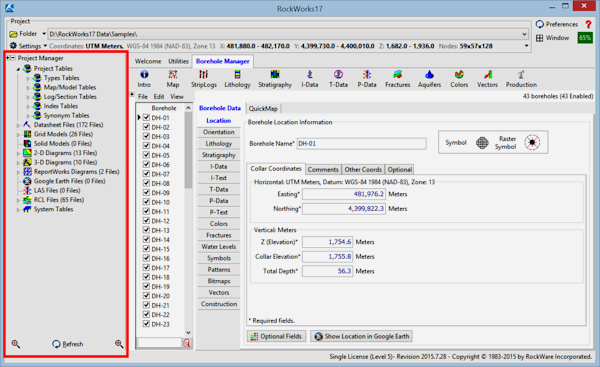
Project Manager: The Project Manager is a pane along the left side of the program window, which displays a list of file and tables in the current project folder and database. Expand this heading to set up how the Project Manager pane will be displayed.
- Monitor Project Folder: Check this box if you want RockWorks to automatically refresh the contents of the Project Manager.
! If you are using RockWorks on a Macintosh computer which is running a Windows OS, you may need to turn this off.
- Create 2D Previews: Insert a check in this box if you wish to save a "preview" of each Rw2D file that you save in RockPlot2D, for display in the Project Manager pane along the left edge of the program window. If activated, expand this heading to specify how big the previews should be, as a percent of the size of the original graphic image (default = 25%). Note that the Create 2D Previews option must be checked if you want to see previews in the Project Manager, as established above.
- Show Project Manager Preview Images: Insert a check here to display graphic file previews as you hover the mouse over the file name. (See also Create 2D Previews, below - that setting must be activated in order for the graphic previews to be available.)
RockPlot2D
- Enable Anti Aliasing: Use this checkbox to turn on/off anti-aliasing of fonts in RockPlot2D. Anti aliasing smooths the appearance of text on the screen and in raster exports but can make very (000) small text appear fuzzy. With anti aliasing disabled small text may appear pixelated. This also applies to RockPlot2D files displayed within ReportWorks as well as all printing and exporting to raster files.
Updates
- Proxy Settings: If you use a proxy server to access the internet you can, if needed, specify manual settings for the proxy.
-
- Resolve all host names locally: Use no proxy, therefore all host names are resolved locally either with the machine's 'Hosts' file or the domain's DNS server.
- Use System Settings: By default RockWorks will use your system defaults.
- Use Manual Settings: RockWorks checks for updates and downloads the new installation (and any other Help menu downloads you may choose) using the http protocol on port 80. If you have to enter a user name and/or password for downloads via http, you can try using these Manual Settings to bypass the Proxy.
- Proxy address: Enter the address for your proxy server. Since Rockworks is only looking at http protocol, the proxy server address can be entered as "http=http://my_http_proxy" or more simply by the server name "my_http_proxy".
- Proxy ignore list: If allowed, enter www.rockware.com to have the proxy server ignore this address and allow access to the RockWare website. You may need to set this up on the system level. For more information on the proxy settings (address and ignore list) see
http://msdn.microsoft.com/en-us/library/aa383996(VS.85).aspx.
- Proxy UserName: Enter your user name here.
- Proxy Password: Enter your username's password in this prompt.
! If your proxy server is blocking access to the RockWare website for update information and downloads, and the manual settings are not permitted by your organization or they aren't working properly, you should deactivate the "check RockWare website for newer version on startup" option. You can always refer to our user forum for postings on the availability of new builds of the program, and download them manually from our website.
- Check RockWare Website for Newer Version on Startup: Insert a check here to have RockWorks check, each time it's started up, whether there's a newer version on the RockWare web site, and display an alert if there is. If desired, you can choose to save the latest installation program to your local computer. Once the download is complete you can then run the installation program to re-install RockWorks.
Both the initial version check, as well as the download, are done on separate threads, so the program should be able to launch even if it's trying to check the RockWare site for update information, and should run while the download is done in the background.
Visible Features: The options within this menu allow you to control which menu groups will be visible when the program is re-started. If you are feeling overwhelmed by the number of menu options in RockWorks, this can be a nice way to focus on the program tools you use and hide those that you don't.
- Filter: Use the items in this drop-down list to quickly enable/disable specific menu groups based on licensing level. Click the Apply Filter button to apply the filter, turning on/off specific menus.
- Use the detailed list below the Filter item to perform additional "fine-tuning" of display options. Insert a check in items to be displayed, remove the check-mark from items to be hidden.
Warnings
- Warn User If…
- No Points Located within Project Area...
- When Creating Grids and Solids: If checked, the program will warn you if there are no data points being sent to the gridding or solid modeling routines, typically if your project dimensions are outside your data, or if you’ve turned on data filters that are removing everything.
- When Modeling a Stratigraphic Horizon: If checked the program will notify you if there are no points for a particular stratigraphic top or base. Usually this should be left on, but can be turned off if you have a formation defined in the Stratigraphy Types table for which you have not yet entered any data, and don’t want to be repeatedly warned about missing data.
- Grid is Missing when creating stratigraphic models: If checked the program will notify you if a grid model is missing as it builds your stratigraphy model. As above, this should probably be left on, but can be turned off if you have a formation defined in the Stratigraphy Types table for which you have not yet entered any data, and don’t want to be repeatedly warned about missing surface models.
- File not saved: When this setting is activated, the program will display a "Do-you-want-to-save?" reminder when you close a RockPlot2D or RockPlot3D graphics window and the image has not been saved (the image window reads "Untitled" in the title bar), or if editing changes have not been saved. We recommend that you leave this setting on.
- Available Memory Drops Below a User-Defined Level: Check this box to tell the program to display a warning if available memory drops below a specified percent of total memory.
- Memory Warnng Level (% of Available Memory): Enter the memory level at which the warning should be triggered.
Miscellaneous
- User Prefix: Use this option to define, for the current user, a unique text prefix that is to be added to the user's menu settings file, so that their settings remain separate from those of other users.
Why would you do this? Background: RockWorks stores the current suite of menu settings - gridding method, contour line color, and such - in a file named "menus.ini" in the project folder's "system" sub-folder. If you have several people working in a project at the same time, then they will all be writing to this settings file concurrently. This can create maddening situations whereby User-A's settings keep changing, as User-B modifies the same menus.
The solution: Enter a user prefix here. In this way, User-A's menu settings will be stored in a file named "User-A-prefix_Menus.ini" where "User-A-prefix" is the User Prefix value entered here.
- Number of Processors: The very first time RockWorks is started up on a particular computer, it looks to see how many processors you have on your computer - the number is displayed here. This way it can take advantage of multiple processors (if you have them) to multi-thread certain modeling procedures. You can select a different number if you don't want RockWorks to have access to all available processors.
See also
- RockWorks Tables for information about the program's reference "libraries" of patterns, symbols, colors, and more. In earlier versions, they were accessed from the Preferences window. They are now accessed via the Project Manager along the left edge of the main program window.

RockWare home page