RockWorks | Utilities | Imagery |
Drape (Lay Image over 3D Surface)
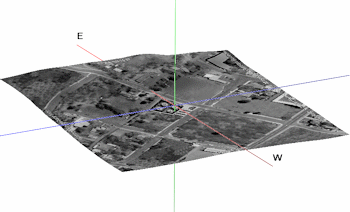
"Draped" bitmaps are images (maps, airphotos, etc.) that are warped over an existing grid (surface) model. This tool does not require a datasheet, but does require that a bitmap image exists already. Supported raster formats include: BMP, JPG, EMF and WMF, PCX, PNG, TGA, and TIFF.
! This tool will stretch the image to fill the grid model boundaries.
! The image and the grid model must reside in the current project folder.
Menu Options
Step-by-Step Summary
Menu Options
- Drape Parameters: Click the Options button to the right to access the drape settings.
- Image File: Browse for the name of the raster image you want to drape over a grid model. The supported file types are listed above.
- Grid Model: Browse for the name of the surface model (.RwGrd file) that contains the elevations over which the image is to be draped. For example, if you have been working in the Borehole Manager, you might want to look in the Project Manager for an .RwGrd file with the name of your upper-most formation.
- Layer Name: Type in a name for this layer; it will simply be used to label the image in RockPlot3D. For example, if the image represents a satellite image, you might name this layer "Satellite Image."
- Vertical Offset: Use this setting to offset the image above or below the grid model's surface. This can prevent interference between them if plotted together in RockPlot3D. The offset is entered in your project units; if your coordinates represent feet and you enter "5" then the draped image will be created at 5 feet above the grid model's surface. If set to 0, the image elevations will match the grid.
- Set Transparent Color: Insert a check in this box if you want to specify a specific color in the bitmap image to be displayed transparent. For example if the image has a white background and you would like that part to be see-through, you would select white.
If activated, click on the color box to choose the image color that is to be set to transparent.
- Reference Cage: Insert a check here to include reference labels or lines in the output 3D image. (More)
Step-by-Step Summary
- Access either the RockWorks Utilities program tab.
- Select the Imagery | Drape menu option.
- Enter the requested menu settings, described above.
- Click the Process button to proceed.
The program will read the indicated raster image, assign it boundaries that equal the grid model boundaries, assign its pixels the elevations of the selected grid model, and display it in a RockPlot3D tab in the Options window.
- You can adjust any of the options along the left (such as offset or transparent color) and click the Process button to regenerate the 3D image.
! Each time you click the Process button, the existing display will be replaced.
- View / save / manipulate / print / export the image in the RockPlot3D window.
Tip: Use RockPlot3D’s File | Save As to save the draped image view, then use File | Append to append an existing RockPlot3D view to this image.
See also: Rectifying Images if you need to rotate and/or crop the image prior to draping.
 Back to Imagery Menu Summary

RockWare home page