RockWorks | Utilities | Solid | Math | Resample
This program reads an existing solid model and create a new model based on the current project dimensions. You can use this tool to resize solid models that are to be filtered against or run through mathematical operations with each other. Three methods are offered: sector-based averaging (slow), filter-based averaging (fast), and closest point (for lithology and stratigraphy models).
Menu Options
Step-by-Step Summary
Menu Options
- Input (Solid) Model: Click to the right to browse for the name of the existing RockWorks solid model file (.RwMod) that the program is to read and manipulate.
- Output (Solid) Model: Click here to type in the name to assign to the new solid model file that the program will create, which results from the resampling operation.
- Adjust Output Dimensions: Click here if you need to view or edit the current output dimensions. The output model will be generated using the current output dimensions settings. (See Viewing and Setting Your Output Dimensions.)
- Set Voxels Outside of Input Bounds to Null: Insert a check in this box if any nodes outside the extents of the original model are to be set to null. In other words, if you are resampling the input .RwMod file to larger dimensions, those outer nodes will not be assigned an interpolated value.
- Sector Based: Choose this option to use a sector-based resampling method. For each node within the new model, the program will locate the closest node from the original model within each quadrant. These nodes are then used to estimate (via an inverse-distance-squared algorithm) a value for the new node.
WARNING: Unfortunately, this program is outrageously slow (assuming that the output model is larger than the input model) and should therefore be considered as a last resort when compared with re-modeling the original data.
- Filter Based: Choose this option for a faster resampling method. Under this scheme, for each node in the output model, the program looks at the closest n nodes in the original model, and computes their average.
2x2: average of the 4 closest nodes.
3x3: average of the 9 closest nodes.
4x4: average of the 16 closest nodes.
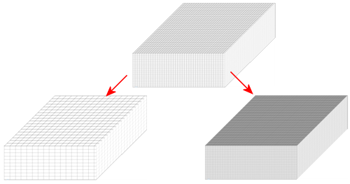
The 2x2 filter is faster while the larger filters provide more smoothing. Filter-based resampling is significantly faster than sector-based resampling but may show some edge effects. The image below illustrates a solid model resampled to twice its density along all axes, using the different filters.

- Closest Point: Choose this option if you are resampling Lithology or Stratigraphy solid models, in which you don't want to get a gradational averaging of the node values. Instead, the value of the closest original node will be used for the resampled node, thus retaining the original material type classification.
- Create 3-Dimensional Diagram: Insert a check here if you want to create a plottable 3D diagram of the resulting solid model. Expand this item to establish the diagram settings.
- Diagram Type: Choose Isosurface to display the solid model as if enclosed in a "skin". Choose All Voxels to display color-coded voxels. (More.)
- Iso-Mesh: Use this option to plot a series of polylines that represent three-dimensional contours at a user-defined cutoff. Expand the heading to establish the settings. (More.)
- Color Scheme: Click on the Options button to the right to access a variety of pre-set color schemes, or to create your own. (More.)
- Reference Cage: Insert a check here to include vertical elevation axes and X and Y coordinate axes in the 3D diagram. Expand this item to set up the cage items. (More.)
- Include Legend: Insert a check here to include an index to the colors and G values in the diagram. (More.)
Step-by-Step Summary
- Access the RockWorks Utilities program tab. This tool does not require that any data be displayed in the datasheet. The only input file is the existing solid model.
- Select the Solid | Math | Resample menu option.
- Enter the requested menu settings, described above.
- Click the Process button to continue.
The program will load the input solid model file, recreate the new solid model using the new project dimensions and the selected method, and store the resulting solid model file on disk under the output file name you selected. If you have requested a diagram, it will be displayed in a RockPlot3D tab in the current window.
- View / save / manipulate / print / export the diagram in the RockPlot3D window.
 Back to Solid Menu Summary

RockWare home page