RockPlot2D | File | Export | RockPlot3D
or
RockWorks | Utilities | Grafix | 2D Utilities | Export | RockPlot3D
This tool is used display an existing RockPlot 2D image (Rw2D file) in RockPlot 3D, either draped over a grid model or floating at a particular elevation.
Menu Options
Step-by-Step Summary
Tips
Menu Options
- Input (2D) File: (Grafix menu only): Click to the right to browse for the RK6 file, already saved in RockPlot2D, to be exported. This file must have already been saved in the RockPlot2D window. See Saving RockPlot2D Images.
- Projection
- Float: Choose Float if you want the image to float as a flat plane at a particular elevation.
- Elevation: Click to the right to type in the elevation at which the image is to be floated.
- Drape: Choose Drape to drape the image over a RockWorks grid model, so that the 2D image takes on the elevation (shape) of the underlying grid surface. Expand this heading to specify grid details.
- Grid: Click to the right to browse for the name of the grid model (RwGrd file) over which the image is to be draped.
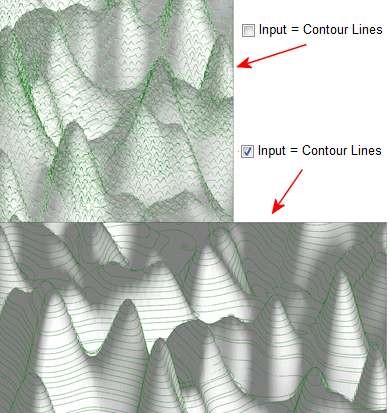
- Input = Contour Lines based on Reference Grid: Insert a check here if the Rw2D file contains contour lines which were generated from the input grid (above). By checking this box, you can avoid vertical crenulations.
- Offset: Here you can specify a vertical offset if you want to bump the image a little above or below the grid elevations, which can prevent interference of intersecting surfaces in RockPlot3D.
- Note that the RockPlot2D image must lie within the same coordinate range as the data in the selected grid model for the draping to take effect.
- Here is an image of a 2D land grid map of section boundaries shown after draping over a grid surface and displaying in RockPlot3D.
- Font: Click on this item to select a font type and size for any text in the 2D image.
- Group Title: Click here to type in the name for the floating image as displayed in RockPlot3D. This is typically a name that will help you to identify it when displayed with other 3D items.
- Reference Cage: Insert a check here to request plotting of 3D axis coordinates. Expand this heading to establish the cage settings.
Step-by-Step Summary
- From RockPlot2D: If necessary, open the Rw2D file you wish to export. (See Opening Plot Files.) Then, select the File | Export | RockPlot3D command from the RockPlot2D menu.
- OR -
From the RockWorks Utilities program tab: Select the Grafix | 2D Utilities | RockPlot2D -> RockPlot3D menu option.
- Enter the requested menu items, described above.
- Click the Process button to continue.
The program will read the contents of the RockPlot2D window or the specified Rw2D file and translate this vector information to a RockPlot3D-compatible XML format. The resulting image will be displayed automatically in a new RockPlot3D window or in a RockPlot3D tab in the current window.
- From here you can save the image, append it to another RockPlot3D view, and more. See RockPlot3D Overview for details.
Tips
- Any polygons drawn in RockPlot2D will be exported as opaque to the 3D window.
- Pattern-filled polygons will be exported with color-fills only since the line patterns are not supported in the 3D window.
- If it's important for polygon transparency and patterns to be displayed in the 3D scene, you should export the RockPlot2D graphic to a raster image (such as JPG or PNG), then display that image in RockPlot3D via the Imagery | Drape or Imagery | Float programs.
 Back to Export menu

RockWare home page