Use the Folder tab in the Create New Project Wizard window to define some basic project options.
Applies to: Utilities, Borehole Manager
 Back to new-project introduction | Next: Advanced database settings. (Optional)
Menu Options
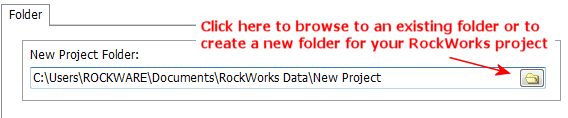
- New Project Folder: Here you define the name and location of the new RockWorks project folder.
Easiest: Accept the default "\RockWorks17 Data\New Project" name (in your My Documents folder).
Or, replace the "New Project" default name with your preferred folder name, by typing it into the prompt. If the folder does not exist, then RockWorks will create it for you.
Or, click on the open-folder button to the right of this prompt to browse to an existing folder on your computer or to create a new folder.
To create a new folder, select the folder inside which the new folder is to be created (such as "RockWorks17 Data" in the picture below), and click on the Make New Folder button shown along the bottom of the window. A "new folder" will be placed inside the selected folder, ready for you to type in a name.

- Database Engine:
- Use Default Database Engine: Choose this option to use the default database engine (SQLite).
- Customize the Database Engine (Advanced): Select this option to display advanced settings that allow you to customize the database to be used. (More info...)
- New Project Settings: Use these to define how RockWorks is to structure your new project database.
- Base the New Project on Default Settings: If you want to create a completely new, blank project using generic (factory) default settings, select this item. This is a good choice if you haven't modified the database setup in your projects up to now, with customized tabs or fields, or if you don't have any data types to import.
- Base the New Project on an Existing Project: If you want to create your new project based on an existing database, select this option. This is a good choice if you have customized another project with new Location fields or other table customizations, and you want this new project to be based on that setup. This process also allows you to import data types and actual data from the existing project.
- Click the Next button.
Back to new-project introduction | Next: Advanced database settings. (Optional)

RockWare home page