Menu Options
- File Tab:
-
- Exit: Closes the Stratigraphy Contact Picker window, offering the choices of:
-
- Discard Changes: Any data postings you created in the formation picker will be discarded; data will not be posted to the project database.
- Save Changes without Adjustments: Saves the depths as listed in the data table, posting them to the project’s Stratigraphy table in the database.
- Adjust Contacts & Save Changes: Automatically adjust the depths of the formation tops to equal the depths of the base of the next formation upward, posting the depths to the Stratigraphy table in the project database.
- Help: Displays the Help messages for the Stratigraphy Picker tool.
- Edit Tab:
-
- Stratigraphy: Displays the Stratigraphy Types Table, where you can add new formations and adjust formation order. You cannot remove formations from the Types table from within the Contact Picker.
- Adjust: Edits the contacts such that there is no gap between a formation top and the base of the overlying formation. The program splits the difference between the posted depths.
- View Tab:
-
- Zoom Button: Allows the user to draw a rectangular "rubber-band" around the specific area to be enlarged.

- Redraw: Updates the log display based on the data.
- Zoom: You can use this drop-down list to adjust the zoom percent.
- Vertical Exaggeration: Type in a number > 1 to stretch the displayed logs vertically. Type in a number < 1 to compress the displayed logs vertically.
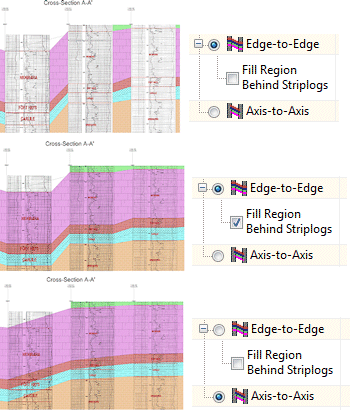
- Correlation Style: Use these buttons at the top of the View tab to define how the correlation lines are to be drawn:
- Edge to Edge: Log to log correlations connect the edges of the logs to one another. This can be helpful if you are picking the unit from raster logs which are fairly wide.
- Fill Region Behind Striplogs: Check this option if the correlations are to be displayed as horizontal lines behind the logs themselves.
- Axis to Axis: Log to log correlations connect the axes of the logs to one another. This setting is used when correlating thin logs in which a horizontal fill within the logs themselves might be misleading from a structural standpoint.
 Watch Video
- Decimals: Click on the Decimals item to specify the number of decimal places to store in the recorded depths.
- Edit Menu (data):
- Cut: Removes any highlighted text from the data pane and places it in the Windows clipboard.
- Copy: Places a copy of any highlighted text in the data pane into the Windows clipboard.
- Paste: Inserts the contents of the Windows clipboard into the data pane, starting at the current cursor location.
- Delete: Deletes the contents of the currently-highlighted cell(s) in the data pane.
- Cut All: Removes all entries from the data pane.
- Copy all: Copies all entries in the data pane.
- Column Menu (data):
- Enlarge: Widens all data columns.
- Reduce: Narrows all data columns.
 Back to Picking Stratigraphy Contacts

RockWare home page