RockWorks | Utilities | Graphix | 3D Utilities | Montage
This program is used to combine multiple RockPlot3D files (*.Rw3D) into a single Rw3D file. This functions just like the Append menu option, but instead of being limited to two files, it can combine any number of files. The program reads the Rw3D file names from a list you've entered into the Utilities datasheet. The combined image is displayed in a new RockPlot3D window. The files to be combined must be RockWorks Rw3D files, and they, as well as any linked files must reside in the project folder.
See the Append tool to combine just two Rw3D files.
Menu Options
Step-by-Step Summary
Follow these steps to create a combined image of two or more Rw3D files.
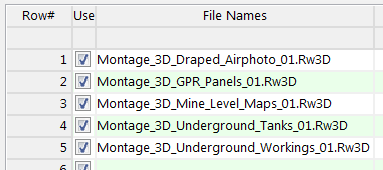
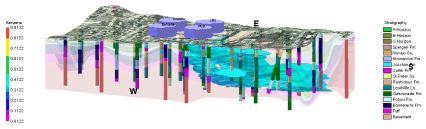
The program will open the first "Rw3D" file listed in the montage table. It will then locate the second "Rw3D" file in the table and append its contents onto the end of the first file. It will continue in this manner for as many files as are listed in the montage table. If it cannot locate any of the listed files, they will simply be omitted from the combined scene.
The completed, combined image will be displayed in a RockPlot3D tab in the options window. If you are combining several files and they are large in size, be patient - this can take a few moments.
! Each time you click the Process button, the existing display will be replaced.
![]() Back to Grafix Menu Summary
Back to Grafix Menu Summary
![]()