Borehole Operations | Maps | Google Earth Borehole Map - Advanced
Use this tool to display your borehole locations with symbols in Google Earth. The program will use the Google Earth Icon symbol currently displayed in the Location tab for each hole. You can also include borehole labels as well as other data in the borehole description fields, such as lithology, stratigraphy, water levels, and comments; these can be accessed in Google Earth by double-clicking on the symbol. Well traces for deviated holes can also be included.
Translation of your borehole coordinates to longitude/latitude will occur automatically. Google Earth is a separate program, installed separately from RockWorks.
Feature Level: RockWorks Basic and higher
Menu Options
Step-by-Step Instructions
- Boremap Advanced
-
- Symbol Size: Use this to define how large the map location symbols will appear in Google Earth. The default = 1.0; a larger value will create larger symbols, and a smaller value will create smaller symbols.
- Include Labels: Insert a check here to include borehole ID labels in the output map. Click the color box to define the color for the labels and the size (default = 1.0). Labels are included in the examples on this page.
- Show Well Paths (Inclined & Deviated): Insert a check here if any of your holes are not vertical and you want to include a straight line connecting the XY location for the drillhole top and base. Click the color box to select the well path line color. Type in the thickness in pixels (default = 3). You can also choose to plot a symbol at the TD location - expand this heading to choose the symbol design (click to the right) and size (default = 0.5).
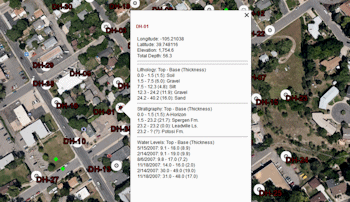
- Linked Description Includes...: Expand this heading to define any/all additional data to include in the Description fields in Google Earth. The example below illustrates borehole description fields listing lithology, stratigraphy, and water level data, as displayed in Google Earth. Be advised that if you include a lot of data in the linked descriptions, the output file can take longer to generate - be patient.
- Output Options: Click on this tab to define the output file and display settings.
-
- Output File Name
-
- Automatic: Click this option to have RockWorks assign a name to the KMZ file which will be generated for display in Google Earth.
- Manual: Click this option to type in your own file name. The extension is ".KMZ".
- Display output within Google Earth: Check this box if you want to display the output at this time in Google Earth.
-
- Use Custom View: If unchecked, the starting viewpoint for the map will be determined automatically. If checked you can set a custom view.
-
- Longitude, Latitude: Type in the longitude and latitude coordinates where the viewpoint will be.
- Heading: Type in the 0 to 360 degree bearing from the viewpoint to the map.
- Tilt: Type in the angle downward from the viewpoint to the map.
- Range: Type in the distance in meters above the map for the starting viewpoint.
- Access the Borehole Manager program tab.
- Enter/import your data into the Borehole Manager database. (More info)
- Select the Maps | Google Earth Borehole Map - Advanced menu option.
- Enter the program settings as described above.
- Click the Continue button to create the map.
The program will create a map of the well locations, reading the location information and symbol style from the Location tabs. Requested borehole ID labels will be pulled from the Location table. It will create a KMZ (zip) file containing the KML file. The Google Earth KML and KMZ file names will be assigned automatically.
The resulting map will be displayed in Google Earth, if requested.
"Google" is a trademark of Google Inc.
 Back to Map menu - Summary

RockWare home page