RockWorks | ModOps | Grid | Filters | Polygon Clip
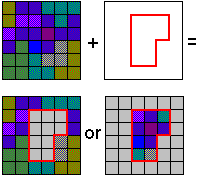
The polygon filter is used to set the grid nodes inside (or outside) a polygon to either a user-specified value or to the values defined within another grid model. A typical application is to zero all of the values outside the polygon to zero. For example, if the input grid represents ore reserves and the polygon represents a lease boundary, the grid statistics will represent reserves only within the lease boundary. A "null" value can be used as the replacement constant.
Feature level: RockWorks Basic and higher
Menu Options
Step-by-Step Summary
- Rules & Filters
Use the tabs at the top of the window to apply spatial filters, time/date filters, or stratigraphic rules to data being displayed in your map layers. (More info)
- 3D Log Design
If you create a 3D Grid Diagram and decide to include logs, click on this tab at the top of the window to set up how you want the 3D logs to look.
See Visible Item Summary and Using the 3D Log Designer for details.
- Input/Output
- Input File (Grid): Click to the right to browse for the name of the existing grid file (.RwGrd) that the program is to read and filter.
- Output File (Grid): Click to the right to type in the name to assign to the new grid file that the program will create, which results from the polygon filtering operation.
- Polygon Table: Click to the right to select the name of the table that you have already created, containing the boundary coordinates of the polygon to be used to filter the input grid file.
- Polygon Vertices are stored in the project database.
- Multiple tables of polygon vertices can be saved for a single project, but you can only use one at a time in this grid filter.
- See Polygon Vertex Tables for information about how to create these tables, where they are stored, etc.
- Filter type: Select the operation.
- Interior: This will re-assign node values that lie inside the polygon, to a constant value. Enter the constant into the prompt.
For example, the polygon could define a lake boundary within a topographic surface, and the constant could be the water level elevation.
- Exterior: This will re-assign node values that lie outside the polygon, to a constant value. Type the constant into the prompt.
For example, the polygon could represent a lease boundary, and the constant could be "0", to zero-out reserves outside the lease. Or, you can use the RockWorks null value of -1e27 to set outside nodes to this value which will be ignored during contouring, statistics computations, etc.
- Interior / Grid-Based: This option will re-assign the node values that lie inside the polygon, to corresponding values stored in another grid model.
For example, if you have a detailed grid model of a pit design, this could replace the topography nodes within the pit boundary.
- Interior Replacement Grid: Click here to select the name of the other grid model, containing the nodes (which lie inside the polygon boundary) that are to be substituted into the original grid. Be sure this grid has the same dimensions and node density as the input model.
- Exterior / Grid-Based: This option will re-assign the node values that lie outside the polygon, to the corresponding values stored in another grid model.
Example: You could substitute node values on the other side of a fault line with those from a separate model.
- Exterior Replacement Grid: Click here to select the name of the other grid model, containing the nodes (which lie outside the polygon boundary) that are to be substituted into the original grid. Be sure this grid has the same dimensions and node density as the input model.
- 2D Grid Map
Check this box to display the output grid as a 2D map at this time.
Click this tab to set up the 2D map layers (bitmap, symbols, labels, line contours, color-filled contours, labeled cells, map border, etc.).
- 3D Grid Diagram
Check this box to display the output grid as a 3D surface at this time.
Click this tab to set up the 3D map layers (surface colors, images, reference cage, etc.).
! You can request both a 2D and 3D representation of the grid model.
- Be sure you have your input data in order. This tool requires that:
- A RockWorks grid model (.RwGrd file) already exists.
- A table containing polygon vertices already exists.
- (optional) If you choose Grid-Based replacement, you'll need to be sure that second grid model exists and is comprised of the same grid dimensions and node density.
- Select the ModOps | Grid | Filters | Polygon Clip menu option.
- Enter the requested menu settings, as described above.
- Click the Continue button to proceed.
The program will load the input grid file, determine whether each node lies inside or outside of the defined polygon, and set the node to the defined constant or to the value of the corresponding grid node in the second model, as per your request. Nodes that are not reset are left unchanged. The resulting node values will be stored in a new grid file on disk under the output file name you selected.
The requested diagram(s) will be displayed in a RockPlot2D tab and/or RockPlot3D tab in the Options window.
- You can click on the main Options tab to the left to adjust any of the program settings, and then click the Continue button again to regenerate the model and diagram(s).
- View / save / manipulate / export / print the diagram in the RockPlot2D or RockPlot3D window.
 Back to Grid Menu Summary

RockWare home page