RockWorks | ModOps | Grid Editor | Edit | Change
Once a new or existing grid file is displayed on the screen as a grid of cells, you can view the Z-value of any cell simply by pointing at it with the pointer-shaped screen cursor, and reading the displayed information in the title bar at the top of the Editor window.
If you want to change the Z-value for a particular node, follow the steps listed here.
- Click in the upper Edit Nodes prompt along the left edge of the window, and select either a Null value or a Real Number value for the replacement value. If you choose the latter, type that number into the displayed prompt.
! Tip: You can also right-click on an existing node to set the default Z to that value.

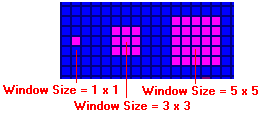
- Click in the Window Size drop-down list and select the number of nodes that will be edited with each click. You can think of this setting like a "brush thickness" - a setting of "1 x 1" will act like a small brush and modify the single node clicked. A setting of "3 x 3" will edit 9 nodes with each click.

- Click on the Change button or choose the Edit | Change menu command.

- Then, click on the grid node that is to be assigned the new Z-value.
- The program will re-assign the node (and any neighboring nodes if the Window Size > 1 x 1) the indicated value, and this will be reflected by an updated display in the title bar. It will also update the color-coding of the cells as necessary.
- Repeat this process for as many nodes as you wish to edit.
- The Grid Editor automatically color-codes the nodes in the model, with pink representing the lowest Z-value and red the highest (a cold-to-hot color scheme). If the Z-value range changes as you edit the model, you may see the color bands change as the automatic colorizing kicks in.
 Back to main Grid Editor topic

RockWare home page


![]() Back to main Grid Editor topic
Back to main Grid Editor topic