If you need to see a list of the blocks of data in the input file, click the small View Data button, shown with the blue arrow above.
The program will load the Available Fields into the pane to the right.
! This field is very important.
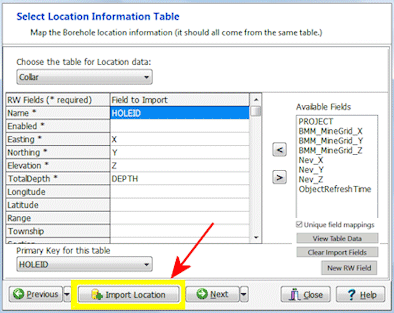
! If these borehole locations have already been imported into the RockWorks database, and you're appending other data at this time, you need only map the Name field. You can then skip directly to #6.
Be sure to map the import fields to the required fields: Name (the borehole ID), Easting (X), Northing (Y), Elevation (Z), and Total Depth.
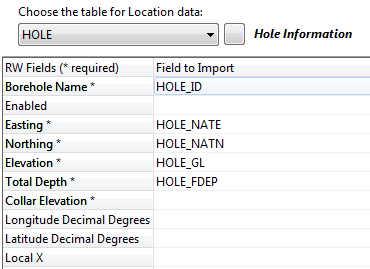
! Not sure what's what? Click the View Table Data button to view the source data block. From there, you can click on the View Structure button to view the field definitions.
- In the New Field window, enter the Field Name and select the Field Type from the list. The Display Label and Description fields will be populated automatically with the Field Name; you can add/replace information as you wish.
- Click OK to accept the new information, and this new field will be added to the bottom of the Field to Import list.
! This is really important.
- Create New Record: If a borehole ID exists in the RockWorks database, the importer will create a new borehole record (with a new name, appending "_1") for all import records you've mapped for import that have the same borehole ID.
For example, if there is already a borehole named "BH-01" in the project, and you're importing locations for a borehole named "BH-01," the program will create a new borehole record named "BH-01_1" and import the location data into that new record, leaving the original borehole record unchanged. - Skip Existing Record: If a borehole ID exists in the RockWorks database, the importer will skip all import records with the same borehole ID.
For example, if there is already a borehole named "BH-01" in the project, the importer will not import any new locatoin data flagged for a "BH-01" boring, and the original borehole data will remain unchanged. - Replace Without Warning: If a borehole ID exists in the RockWorks database, the importer will delete all existing location data for that borehole and replace it with the import records you've mapped for import with the same borehole ID.
For example, if there is already a borehole named "BH-01" in the project, the importer will delete all existing location information for that borehole from the database, and then import the mapped ASCII data for BH-01. The original borehole record will be completely replaced.
! Be sure about this. All existing data for existing boreholes will be lost. - Replace With Warning:This behaves like the previous option, but will display a warning for each hole, allowing you to select the overwrite options manually.
! This is really important. This import tool processes one table at a time, not all at once. If you don't click the button, the Locations will not be brought into the RockWorks database, and none of your remaining data (Steps 4 - 6) will, either.
Or, click on the small drop-down arrow by the Next button to jump directly to the next import screen of interest.