The program will load the Available Fields into the pane to the right.
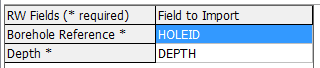
Be sure to map items to the required fields: Borehole Reference (the borehole ID), and Depth (DEPTH) in this example.
! Not sure what's what? Click the View Table Data button to view the source data table.
- Spreadsheet: Choose this if the import file has multiple data columns for a single depth point, as you might see in a spreadsheet.
-

- Columnar: Choose this option if the import file has one column of measurements for each depth point flagged with a Type column, like the example shown below.

For Columnar layouts, select the name of the column that contains the track names (Column for Name) and the name of the column that contains the measured values (Column for Value).
! If you aren't sure, click the Map Required Fields tab again and click the View Data Table button to see the actual data listing.
Now, for each P-Text column you wish to bring into RockWorks, click on its name in the Fields to Choose From column, and either drag it to the Fields to Import column or click the "<" button.
You can import as many of the fields as you wish.
If you make a mistake, you can return a field to the right-hand pane by dragging it or by clicking on the ">" button.
! This is really important. This import tool processes one table at a time, not all at once. If you don't click the button, the data will not be brought into the RockWorks database.

Or, click on the small drop-down arrow by the Next button to jump directly to the next import screen of interest.