How it's Used
How to Insert a Picture into a Log Design
Menu Settings
How to Review the Settings
How to Reposition/Resize the Picture
The Header/Footer Picture button is used to insert a picture into the header or footer of the log. This would typically be used to insert a company logo into the log design, but could also be used to insert a picture of a site map, etc. The picture may be in any of the following graphic formats: BMP, JPG,PNG, TGA, and TIFF. This is a fixed design item with no corresponding data file commands.

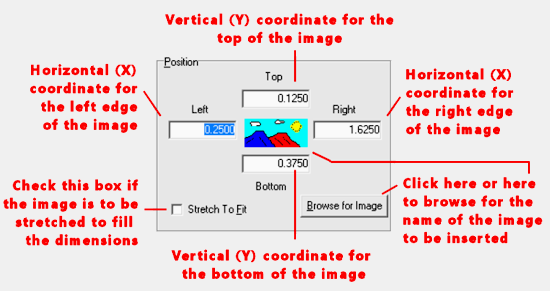
Browse for Image: Click on this button in the lower right portion of the window to browse for the name of the image to be inserted into the design, accessing other folders as necessary. The program can read BMP, JPG, PCX, PNG, TGA, and TIFF-format files. When you have located the file, click on its name, and then click the Open button to select it.
! You can also just click on the picture in the middle of the Position coordinates to browse for the image name.You will be returned to the Graphic Setup window, and the image will be shown in the background, in the design.
Position: These coordinates determine the placement of the rectangle in the header or footer of the log.
You may change the position of the picture by editing these values, or by moving the picture itself on the work screen. Remember that the y or vertical coordinates are expressed in coordinates relative to the top of the header or footer.
Stretch to Fit: Insert a check in this box if you want Log Designer to stretch the image to fit in the defined boundaries, changing the image's horizontal-to-vertical ratio. Leave this box cleared if the aspect ratio for the image is to be maintained.
If you need to review the settings you established, you can:
! If the picture that you insert is large, it may exceed the width of the log page, making its resizing "handles" inaccessible. In this case, you will need to use the dialog box Position settings, above, to adjust the size of the picture.
See Move or Resize Header/Footer Items for information about dragging, resizing, and aligning items.
![]() Back to Header/Footer Item Summary
Back to Header/Footer Item Summary
![]()